12-Strand End-for-End Splice Class 1
 Machovec is proud to bring you these rope splicing instructions. End-for-end rope splicing may be performed on new or used rope. This is an all-purpose splice technique designed for people who generally splice used rope as frequently as new rope. By following the procedure below, the splice can retain from 90% to 100% of average new rope strength and in used rope up to the same proportion of residual used rope strength.
 STEP 1 Marking Measurements
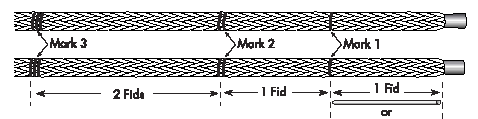
Tape ends of line to be spliced. Lay two ropes to be spliced side-by-side and measure one tubular fid length, (two wire fid lengths because wire fids are half the size) from taped end of each line and make a mark - mark 1.
![]() From mark 1 measure one tubular fid length (two wire fid lengths) and make mark 2 on both lines.
From mark 1 measure one tubular fid length (two wire fid lengths) and make mark 2 on both lines.
From mark 2 measure two tubular fid lengths (four wire fid lengths) and make mark 3 on both lines.
 STEP 2 Tapering Tail
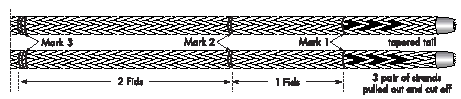
From mark 1, in the direction of the tapered end of the line, mark every second right and left strand* for three strands.
Cut every marked strand and pull out of line (tape at end can cause resistance and may have to be removed in order to pull out cut strands).
Tapered end will now have only 6 strands remaining. tape tapered tail tightly to keep from unbraiding during the rope splicing process.
*Larger rope diameters may have pairs of strands in right and left direction. In this case, treat the pairs of strands as a single strand, marking and cutting both in each direction as described above.
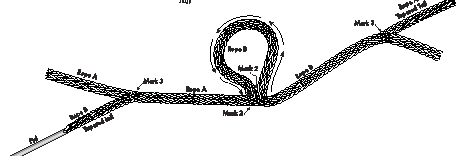
STEP 3 Repositioning Ropes
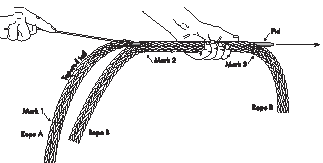
Reposition ropes for splicing according to diagram below.

 STEP 4 Burying Rope A Into Rope B
Attach fid to tapered end of rope A and insert fid into rope B at mark 2 and bring out at mark 3. Then remove fid.
Pull tapered tail of rope A until you have buried up to its mark 2. With larger lines, once you have fid and tapered tail through the line, tie off tail to stationary object; then use both hands and weight of body to bury rope B up to mark 2.
Leave tail sticking out.
 Step 5 Finish Burying
Attach tapered tail of rope B to fid. Insert fid into rope A approximately the diameter of the line away from insertion point of rope A into rope B. Bring fid and tail out at mark 3 of rope A. Following same procedures as in step 4 to bury rope B up to its mark 2. Leave tail sticking out.
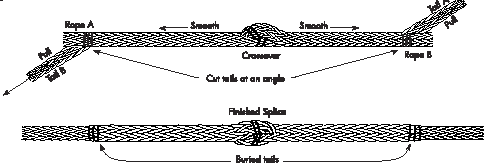 Step 6 Smooth Out Splice
Pull tails to tighten crossover. Then, smooth braid in both directions away from the crossover. Now cut off tails - cut the tails on an angle so as to give them a point.
Give a final smoothing, away from crossover, stroking rope firmly. Tails should bury inside cover. Rope splicing is a bit of an art, form as well as function.
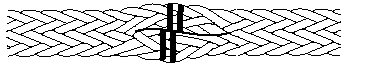
Lock Stitching Procedure
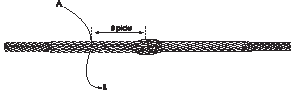 Step 1
From mark 2 at crossover, count 8 picks in either direction and insert stitching twine.
Step 2
 Working towards the crossover, pass end "b" back and forth through splice until a minimum of 2 complete stitches have been made on each side of crossover.
Step 3
![]() Tie an overhand knot in each tail, as close to its exit point as possible.
Tie an overhand knot in each tail, as close to its exit point as possible.
 Insert tail of stitching twine at extract location where twine emerges. Using a needle or small fid, pull (or push) through rope at a slight angle. Pull hard on the end of the twine so that the knot disappears inside the rope. Trim off the remaining twine close to the rope.
We hope you found these rope splicing instructions helpful. If you require any further assistance, feel free to call Jay @ 763-263-9835.