12-Strand Single Braid Tuck Eye Splice
Machovec is proud to bring you these rope splicing instructions. Eye splicing a rope is one of the most asked for procedures. Having a permanently fixed loop (eye splice) on a rope end removes the need to tie and then untie a knot each time you wish to use it. Rope splicing is a very strong method of fixing a loop eye; as the rope is pulled tighter so the spliced strands become more and more squeezed and locked into place. Rope splicing removes the worry of a knot becoming undone and a spliced eye is less bulky. You can buy 3-strand, 8-strand or 12-strand rope with an eye already spliced in or you you can make your own by following these instructions for eye splicing a rope.
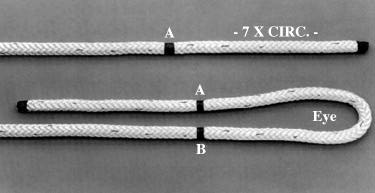 STEP 1 - Eye Size
Measure from the end of the rope 7 times the circumference (or 21 times the diameter) in inches and make mark A. Tape at this mark. Form desired eye size and make mark B.
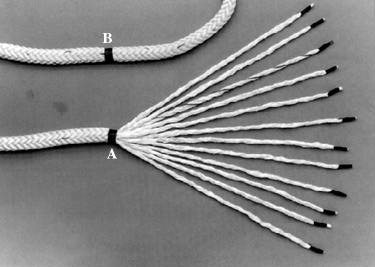 STEP 2 - Strand Separation
Tape each of the 12 strands and unlay strands back to mark A. Try to be careful not to remove twist from individual strands.
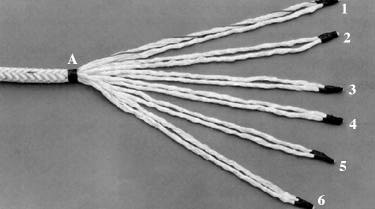 STEP 3 - Pair Strands
Rope is comprised of a total of 12 strands, 6 strands with left hand twist and 6 strands with right hand twist.
Select one left twist strand and one right twist strand and tape together. Repeat this procedure so that you have taped 6 separate strand pairs. Select strands that are near one another as they emerge at tape wrap at mark A.
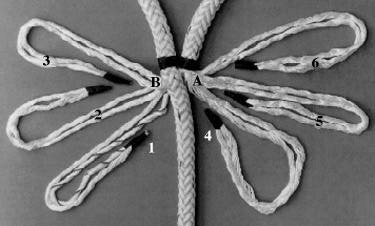 STEP 4 - Marking Pairs
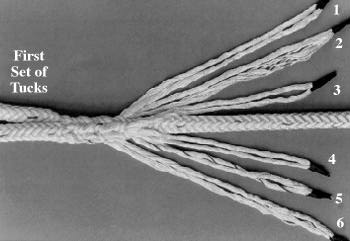
Lay rope out, forming eye. Do not twist rope. Select three tapered pairs closest to the standing part of the rope and mark on tape: "1", "2", "3" respectively. Mark the other 3 pairs "4", "5" and "6".
 STEP 5 - Strand Insertion
With fid, open rope at mark B and insert strand pairs "1", "2", "3" completely through the rope at right angles to the rope axis. Once strands "1", "2", "3" are through the rope, pull each strand so that taped end A is snug against body of rope. It may be easier to pass the strand pairs through the rope one set at a time.
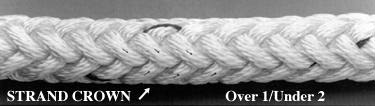
STEP 6 - Initial Strand Tuck
NOTE: Rope braid pattern forms a line of strand crowns running parallel to the axis of rope.
- Starting with strand pair "1", select a row of crowns down the axis of the rope and tuck the pair "1" over one strand and under two strands. Once tucked, pull out slack in strand pair "1". Make only one tuck.
- Now tuck pair strands "2" and "3" in the same way with each pair, select crown row and tuck the individual pair over one strand and under two strands. Pull out slack in each strand.
- With remaining pair strands "4", "5", and "6", select a crown row for each pair and make one tuck. Pull out slack in each pair.
- Remove tape wrap at mark A and gently but firmly pull on each of the strand pairs so mark A is now snug to the base of the eye mark B.
- Now complete two more sets of tucks with each taped strand pair. Be sure to tuck each strand pair down the same crown strand line, try to keep twist in each pair, and continually remove slack from each strand pair after tucking.
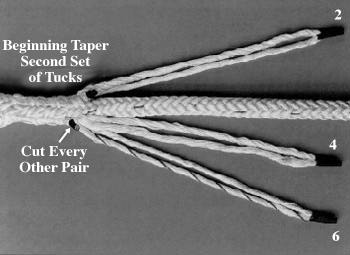
 STEP 7 - Taper
- Cut off strand pairs "1", "3", "5".
- Tuck strand pairs "2", "4" "6" for additional 3 tucks. Retain twist and remove excess slack.
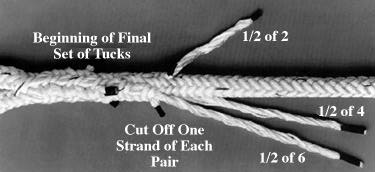
STEP 8 - Final Tucks
- Split each strand pair "2", "4", "6" into 2 individual strands and tape each strand.
- Cut off one strand in each pair leaving a short tail projecting from last tuck.
- Tuck the remaining 3 single taped strands for 3 tucks (over one and under two) removing slack and keeping twist.
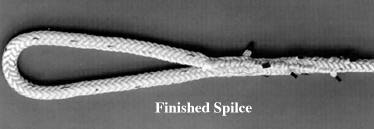
- Now cut off the taped strands, leaving a short tail projecting as shown.
We hope you found these rope splicing instructions helpful. If you require any further assistance, feel free to call Jay @ 763-263-9835.