Double Braid Core-To-Core Eye Splice
Machovec is proud to bring you these rope splicing instructions. Eye splicing a rope is one of the most asked for procedures. Having a permanently fixed loop (eye splice) on a rope end removes the need to tie and then untie a knot each time you wish to use it. Rope splicing is a very strong method of fixing a loop eye; as the rope is pulled tighter so the spliced strands become more and more squeezed and locked into place. Rope splicing removes the worry of a knot becoming undone and a spliced eye is less bulky. You can buy 3-strand, 8-strand or 12-strand rope with an eye already spliced in or you you can make your own by following these instructions for eye splicing a rope.
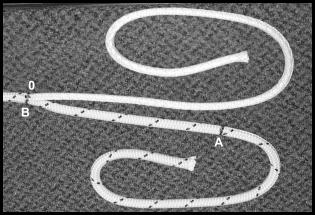
 STEP 1 - Mark Measurements
Place a single wrap of tape on the end of the rope, measure off 3 fid lengths from the end and make a mark on the cover. This is mark A. Form the eye and make a second mark opposite the first. This is mark B. A to B = eye size. Tie a slip knot approximately 10 fid lengths down from mark B.
 STEP 2 - Extract & Mark Core
Extract the core at mark B by bending rope sharply and carefully spreading the cover strand to expose the core. Then pry the core braid out using the pointed end of the fid.
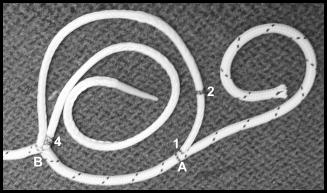
Pace a single wrap of tape on the end of the core and then, while holding exposed core, slide the cover back as far as possible towards the knot. Then smooth the cover back over the core to the point of extraction.  Smooth cover again until all slack is removed and mark the core where it comes out of the cover. This is mark 0. Again, slide the cover back towards the knot and measure one short fid section towards the knot from mark 0 and mark the core. This is mark 1. Measure one more short fid from mark 1, and this is mark 2. Measure 4 fid lengths towards the knot from mark 2 and mark the core. This is mark 3.
 STEP 3 - Insert Core Into Cover
Attach the fid to the end of the core. Insert the core into the cover at mark A around the radius of the eye and out of the cover at mark B. The two sections of the core exiting from the cover at mark B should pass through the same hole between the cover strands.
Pull the core through the cover until mark 1 on the core is aligned with mark A on the cover. Hold mark 1 and mark A together and smooth out the cover from mark A to mark B to remove all of the slack in the cover. After removing all of the cover slack, mark the core tail where it exits the cover at mark B. This is mark 4.
 STEP 4 - Bury Tails
With the fid still attached to the end of the core, insert the core tail into the core at mark 2 and out at mark 3. Pull the core tail through until mark 4 is aligned with mark 2. Pull out sufficient core tail from mark 3 and remove the fid.
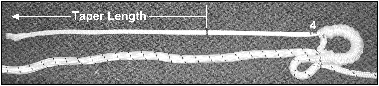 STEP 5 - Tapering the Core Tail
When tapering the core, the distance of full body core should be equal to 1/3 the distance from mark 4 to the end of the core, and the taper length should 2/3 the distance from mark 4 to the end of the core. When tapering take the distance to taper and divide that number by the number of strands in the core. (Example: 28" taper length divided by 12 strands in the core = 2.333") If you cut one strand at every increment of this number (Example: 2.33"), you will have a nice smooth taper.
Pull out one strand for every taper increment beginning at the full taper length. When all the ends habe been pulled, cut and remove all of the strands that have been pulled out.
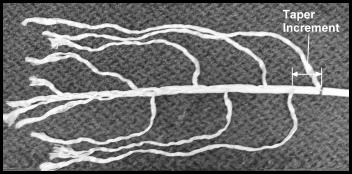
NOTE: When cutting the strands while tapering, do not unbraid the core, leave it braided if possible.
When the taper is finished, hold the core at mark 2 and smooth the core back to bury the section that was just tapered.
 STEP 6 - Bury the Core-To-Core Splice
- Holding the core at the point where marks 2 and 4 coincide, place tension on the rope and smooth out the cover back over the core from the slip knot towards the eye.
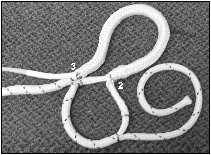
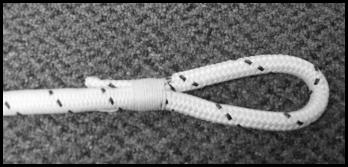
- As the cover approaches the point on the core where marks 2 and 4 coincide, it may be necessary to alternately pull some of the core back out of the cover. Smooth the cover over the exposed core in order to get the cover marks A and B to be side by side as shown in figure below.
- After getting marks A and B side by side, measure back from the neck of the splice 6 inches towards the body and the 6 inch mark.
- Try removing all the slack from the rope and eye, then bunch the slack up within the neck of the splice and the 6 inch mark.
- Before burying the cover tail taper approximately 8 to 10 inches of cover, and tape tightly.
- Attach the cover tail to a very small fid, and proceed to bury the cover tail. Enter at the neck of the splice and exit at the 6 inch mark. NOTE: Make sure not to snag any of the core fibers while burying the cover tail.
- After pulling the fid clear from the 6 inch mark, remove the fid and proceed to work the rope until the entire cover tail is buried. NOTE: The cover tail should be buried so that mark B is buried at least one inch further than the neck of the splice.
- When cover tail is buried completely, mark cover where it exits the 6 inch mark. Pull cover tail tightly and cut at mark. Smooth slack so the cover tail pulls back into the splice.
 STEP 7 - Finishing
After the exposed core, and cover tail have been buried use nylon whipping thread, cross stitch and whip the portion of the splice where the cover tail is buried to prevent any slippage. Whip a distance equal to 1-1/2 times the rope diameter, beginning at the throat of the splice.
NOTE: It may not be possible to bury the cover tail for every rope. If it is not possible then cross stitch and whip the cover tail to the outside of the rope after burying the core. Whip a distance equal to 1-1/2 times the rope diameter, beginning at the throat of the splice. Using vinyl tape (NO MASKING TAPE), tape the end of the cover tail to the body of the rope, than slide the appropriate size shrink tube over the splice and secure.
We hope you found these rope splicing instructions helpful. If you require any further assistance, feel free to call Jay @ 763-263-9835.